How to Download Mac Os in Windows 10
This article will show you how to install mac os ( include both mac os loftier sierra & Mojave ) in VirtualBox virtual machine. And the host os is windows 10. Below are the steps, you can follow them.
1. Prerequisite.
- First, you should install VirtualBox, this is very straightforward in windows, you can just download VirtualBox and install it.
- Whether yous want to install mac os high sierra or Mojave, you lot should fix the high sierra or Mojave iso file get-go, delight read the article How To Download MacOS X High Sierra Installer In Mojave, How To Download macOS Mojave Installer And Convert To ISO File. This step needs you to have a mac book pro, if you do not have i, yous can search the download link ( for example search the sentence macOS Big Sur iso download ) using google and become one.
2. Install Mac OS On VirtualBox Virtual Machine Steps.
2.i Create macOS Virtual Motorcar In VirtualBox.
- Open VirtualBox, click the New button to create a new virtual machine. Input macOS high sierra or macOS Mojave in the Name field, select Mac OS X in the Blazon driblet-down list, select Mac OS X(64-bit) in the Version drop-down listing, then click the Next button.
- Prepare the virtual machine's retention size in the next wizard window, you had amend set a one-half retentiveness size of your physical memory size. This can make the virtual machine run faster.
- Select Create a virtual hd now radio button in the next wizard window. Then click Create button.
- Click the Side by side button in the following two wizard dialog windows until the File location and size wizard dialog window. Input the hard disk drive size that you need in this window.
- Click the Create button in the above window to create the hard disk. And then it volition go to the virtual machine list window, you can see the newly created virtual machine in the left panel, and it's status is Powered Off.
2.2 Configure macOS Virtual Machine To Install macOS Mojave Or High Sierra.
Now the macOS virtual auto has been created, and so we need to do some settings for it. The configuration includes system motherboard & processor, display video memory, cull mac os iso file in storage, and network mapping method.
- Select the newly created mac os virtual machine in the left list panel, and then click the Settings icon in the meridian bar to open the virtual car settings window.
- In the macOS Settings window, click the System particular in the left console, then in the right panel click Motherboard tab —> Boot Order list, uncheck Floppy checkbox.
- In System —> Processor tab, select the processor number that you assign to the mac os virtual machine.
- Select Brandish in the left console, assign all physical memory to this mac os virtual auto'south Video Retentivity in the right panel Screen tab.
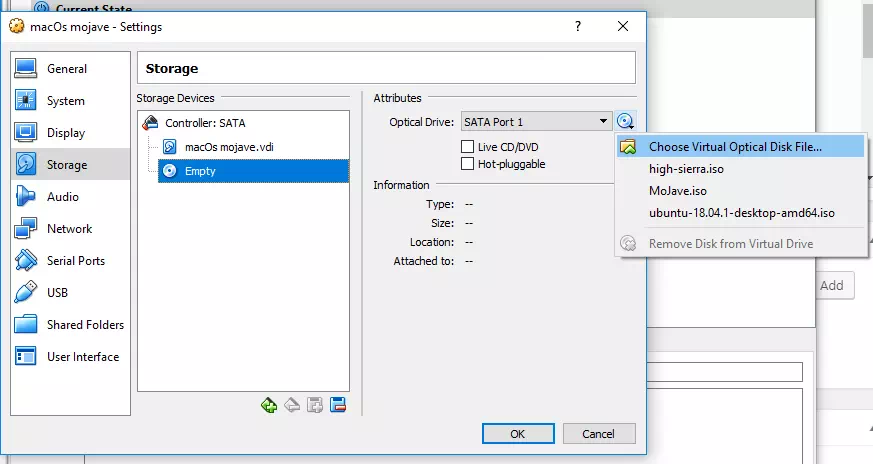
- Click Storage in the left console, then click Empty laser disk in correct panel Storage Devices area, then click the Optical Drive icon, and click Cull Virtual Optical Disk File… bill of fare detail to open up select file dialog, choose the Mojave or high sierra iso file just created or downloaded. Click the Open push in the file select dialog.
- Click Network on the left console, so click the Adapter 1 tab on the right panel and select Bridged Adapter in the Fastened to drop-down list. Click the OK button to close the virtual automobile Settings dialog.
2.3 Run VBoxManage Control Before Start Mac OS Virtual Machine.
Before starting the macOS virtual automobile, you need to run the VBoxManage control tool to configure some settings. This action is very important to install macOS on a virtual machine. And so please be patient to follow the below steps to do it.
- Right-click Windows x offset button, click Run carte du jour detail, then input cmd, click enter key to open dos window.
- Input below command one by one in dos window to configure VBoxManage settings for mac os Mojave . Please use your mac os virtual machine name to supervene upon Your-Mac-OS-VM-Proper name .
cd "C:\Plan Files\Oracle\VirtualBox\" VBoxManage.exe modifyvm "Your-Mac-Os-VM-Proper name" --cpuidset 00000001 000106e5 00100800 0098e3fd bfebfbff VBoxManage setextradata "Your-Mac-OS-VM-Proper name" "VBoxInternal/Devices/efi/0/Config/DmiSystemProduct" "iMac11,3" VBoxManage setextradata "Your-Mac-OS-VM-Proper noun" "VBoxInternal/Devices/efi/0/Config/DmiSystemVersion" "1.0" VBoxManage setextradata "Your-Mac-OS-VM-Name" "VBoxInternal/Devices/efi/0/Config/DmiBoardProduct" "Iloveapple" VBoxManage setextradata "Your-Mac-Os-VM-Name" "VBoxInternal/Devices/smc/0/Config/DeviceKey" "ourhardworkbythesewordsguardedpleasedontsteal(c)AppleComputerInc" VBoxManage setextradata "Your-Mac-Bone-VM-Name" "VBoxInternal/Devices/smc/0/Config/GetKeyFromRealSMC" 1
- If yous desire to install macOS high sierra , then run the below control in the dos window i past 1, employ your mac os virtual machine proper noun to replace Your-Mac-OS-VM-Name .
cd "C:\Program Files\Oracle\VirtualBox\" VBoxManage.exe modifyvm "Your-Mac-OS-VM-Proper name" --cpuidset 00000001 000306a9 04100800 7fbae3ff bfebfbff VBoxManage setextradata "Your-Mac-Bone-VM-Proper name" "VBoxInternal/Devices/efi/0/Config/DmiSystemProduct" "MacBookPro11,3" VBoxManage setextradata "Your-Mac-Os-VM-Proper noun" "VBoxInternal/Devices/efi/0/Config/DmiSystemVersion" "one.0" VBoxManage setextradata "Your-Mac-Os-VM-Proper noun" "VBoxInternal/Devices/efi/0/Config/DmiBoardProduct" "Mac-2BD1B31983FE1663" VBoxManage setextradata "Your-Mac-Os-VM-Name" "VBoxInternal/Devices/smc/0/Config/DeviceKey" "ourhardworkbythesewordsguardedpleasedontsteal(c)AppleComputerInc" VBoxManage setextradata "Your-Mac-Os-VM-Proper noun" "VBoxInternal/Devices/smc/0/Config/GetKeyFromRealSMC" 1
- Delight remember your VirtualBox virtual machine's proper noun carefully, otherwise, you will get the below mistake bulletin. In the below command line, I misspell "macOS Mojave" to "macOS mojava", then it will through error.
C:\Program Files\Oracle\VirtualBox>VBoxManage.exe modifyvm "macOS mojava" --cpuidset 00000001 000106e5 00100800 0098e3fd bfebfbff VBoxManage.exe: mistake: Could not find a registered car named 'macOS mojava' VBoxManage.exe: error: Details: lawmaking VBOX_E_OBJECT_NOT_FOUND (0x80bb0001), component VirtualBoxWrap, interface IVirtualBox, callee IUnknown VBoxManage.exe: mistake: Context: "FindMachine(Bstr(a->argv[0]).raw(), machine.asOutParam())" at line 522 of file VBoxManageModifyVM.cpp
2.4 Get-go Mac OS Virtual Machine.
Now it is time to showtime the mac bone virtual machine to consummate mac os installation.
- Select the mac bone virtual car in the VirtualBox director left console, then click the dark-green Outset button to start it.
- When the virtual machine started, select os language, then click the Continue button.
- Now the macOS Utilities window will pop upwards, you lot can install mac os from a time machine backup, reinstall macOS, or y'all can use Disk Utility to create the first partitioning for the mac bone virtual auto. I recommend you to utilize Disk Utility to create a sectionalisation on the virtual disk, otherwise, you lot may encounter no deejay to select outcome during the installation process. You can read the article How To Fix No Deejay To Select Upshot When Install Mac Os On Virtual Automobile to learn more than.
- Later creating a virtual deejay partition, you lot will get back to the macOS Utilities window, click Reinstall macOS item to offset to install it. The setup sorcerer window is straightforward. Afterwards you select the virtual disk and click the Continue push, you will meet a window to notify you of the installation process ( remaining time, etc ).
- If you meet the below error message during mac bone installation progress. Installation of macOS could not continue, installation requires downloading important content. That content cannot be downloaded at this time. Try once more later. Only wait for some time to reinstall again, this is considering of the network issue.
- When the higher up installation procedure completes, all the files needed have been copied to the virtual disk, the mac os virtual car volition be restarted automatically, merely information technology all the same boots from the installer iso file again, and you lot just see the macOS Utilities window again. So y'all demand more actions to make this virtual car boot from the virtual hard deejay.
2.5 Make Mac OS Virtual Machine Boot From Virtual Hd And Continue Install.
- Close downwards the mac os virtual machine by clicking the virtual machine's shut push button, and select Ability off the machine radio push, and so click OK.
- Right-click the mac os virtual car, and so click Settings menu item in the popup menu listing.
- In the macOS Settings window, click Storage —> MoJave.iso (or loftier-sierra.iso ) —> Optical Drive, select Remove Disk from Virtual Drive bill of fare item in the list to remove the Mojave (or High Sierra ) iso file, so the virtual automobile will non kicking from the iso file again when restart. Click the OK push to save the changes.
- At present start the mac os virtual automobile again, you will enter a command-line shell which is called UEFI Interactive Crush like below.
UEFI Interactive Shell v2.1 EDK Two UEFI v2.40 (EDK II. 0x00010000) Mapping tabular array FS0: Alias(s):HD7a0a1:;BLK1: PciRoot(0x0)/Pci(0x1F.0x2)/Sata(0x0,0x0,0x0)/Hd(one,GPT,B7FA76E7—9D69—40B3—9759—D44AA269151D.0x2B.0x64000) FS1: Alias(south):HD7a0a2:;BLK2: PciRoot(0x0)/Pci(0x1F.0x2)/Sata(0x0,0x0,0x0)/HD(2,GPT,C80B4F68—E146—430F—AC21—C08C8B36D706.0x6402B.0x2575BFB0) BLK0: Alias(s): PciRoot(0x0)/Pci(0x1F.0x2)/Sata(0x0,0x0,0x0) BLK3: Alias(s): PciRoot(0x0)/Pci(0x1F.0x2)/Sata(0x0,0x0,0x0) Press ESC in 1 seconds to skip startup.nsh or any other key to continue. Beat out> _
- Input
FS1:in the above shell command line, then click enter primal, information technology volition switch to FS1 virtual disk, this disk volition save all the mac os install files. You lot tin can run the ls command to list all the files in the FS1 virtual disk.Shell> FS1: FS1:\> _
- Now run the beneath shell command to go to the kick folder in the virtual hard disk. The kicking.efi file is the kick file that will first the residual of the mac os installation procedure.
FS1:\> cd "macOS Install Information" FS1:\macOS Install Data\> cd "Locked Files" FS1:\macOS Install Data\Locked Files\> cd "Boot Files" FS1:\macOS Install Data\Locked Files\Kick Files\> ls Directory of: FS1:\macOS Install Data\Locked Files\Kicking Files\ 06/05/2019 11:xx 893 .disk_label 06/05/2019 11:xx 15 .disk_label.contentDetails 06/05/2019 11:20 3,557 .disk_label_2x 06/05/2019 eleven:20 592,440 boot.efi 06/05/2019 11:xx 488 com.apple.Kick.plist 06/05/2019 11:xx 4,500 PlatformSupport.plist 06/05/2019 11:20 26,190,241 prelinkedkernel 06/05/2019 11:twenty 534 SystemVersion.plist eight File(s) 26,792,66B bytes 1 Dir(s) FS1:\macOS Install Information\Locked Files\Boot Files\> boot.efi
- When yous run the boot.efi file, it will show some command line in the screen, after some while, you will see the mac bone installing dialog window, it will display how much fourth dimension is left to install the macOS.
- When the above installation procedure completes, your virtual machine volition restart, if you are installing mac os high sierra , you will enter the mac os setup interface Welcome dialog window. Just follow the education in the setup wizard, it is straightforward to terminate configuring it.
- But if yous are installing the macOS Mojave , you may enter the UEFI Interactive Shell command interface over again. To ready this issue, you should first install macOS high sierra , and so upgrade your os to macOS Mojave .
References
How to Download Mac Os in Windows 10
Posted by: denmarkwiltow1942.blogspot.com